| MODEL | DT-NH921 | DT-NH931 |
| IIT | Gen2+ | Gen3 |
| Magnification | 1X | 1X |
| Resolution | 45-57 | 51-57 |
| Photocathode type | S25 | GaAs |
| S/N(db) | 15-21 | 18-25 |
| Luminous sensitivity(μa-lm) | 450-500 | 500-600 |
| MTTF(hrs) | 10,000 | 10,000 |
| FOV(deg) | 42+/-3 | 42+/-3 |
| Detection distance(m) | 180-220 | 250-300 |
| Adjustable range of eye distance | 65+/-5 | 65+/-5 |
| Diopter(deg) | +5/-5 | +5/-5 |
| Lens system | F1.2, 25mm | F1.2, 25mm |
| Coating | Multilayer broadband coating | Multilayer broadband coating |
| Range of focus | 0.25--∞ | 0.25--∞ |
| Auto anti strong light | High Sensitivity, Ultra Fast, Broadband Detection | High Sensitivity, Ultra Fast, Broadband Detection |
| rollover detection | Solid non-contact automatic detection | Solid non-contact automatic detection |
| Dimensions (mm) (without eye mask) | 130x130x69 | 130x130x69 |
| material | Aviation aluminum | Aviation aluminum |
| Weight (g) | 393 | 393 |
| Power supply (volt) | 2.6-4.2V | 2.6-4.2V |
| Battery type (V) | AA(2) | AA(2) |
| Wavelength of infrared auxiliary light source (nm) | 850 | 850 |
| Wavelength of red-explode lamp source (nm) | 808 | 808 |
| Video capture power supply (optional) | External power supply 5V 1W | External power supply 5V 1W |
| Video resolution (optional) | Video 1Vp-p SVGA | Video 1Vp-p SVGA |
| Battery life (hours) | 80(W/O IR) 40(W/IR) | 80(W/O IR) 40(W/IR) |
| Operating Temperature (C | -40/+50 | -40/+50 |
| Relative humidity | 5%-98% | 5%-98% |
| Environment rating | IP65(IP67 Optional) | IP65(IP67 Optional) |
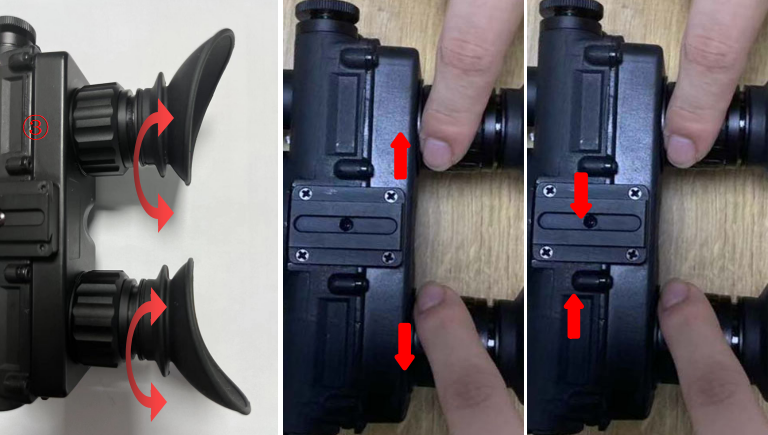 Choose a target with moderate ambient brightness and adjust the eyepieces without opening the objective lens cover. As shown in Figure ③, turn the eyepiece handwheel clockwise or counterclockwise to match the vision of the human eye. When the clearest target image can be observed through the eyepiece, the eyepiece adjustment is complete. When different users use it, they need to readjust according to their own vision. Push the eyepiece toward the middle or pull the eyepiece outward to change the distance of the eyepiece. The automatic mode is different from the "IR" mode, and the automatic mode starts the environment detection sensor. It can detect environmental illuminance in real time and work with reference to illumination control system. Under extremely low or extremely dark environment, The system will automatically turn on infrared auxiliary lighting, and when the environmental illumination can meet normal observation, The system automatically closes "IR", and when the ambient illumination reaches 40-100Lux, The whole system is automatically shut down to protect the photosensitive core components from damage by strong light.
 In order to ensure the user's comfort when using this system, the helmet pendant system is designed with a perfect fine-tuning structure to meet the needs of different users. Up and down adjustment: Loosen the height locking knob of the helmet pendant counterclockwise, slide this knob up and down, adjust the product eyepiece to the most suitable height for observation, and turn the height locking knob of the helmet pendant clockwise to lock the height. As shown in Figure ⑦ the red icon.Left and right adjustment: Use your fingers to press the left and right adjustment buttons of the helmet pendant to slide the night vision components horizontally. When adjusted to the most suitable position, release the left and right adjustment buttons of the helmet pendant, and the night vision components will lock this Position, complete left and right horizontal adjustment. As shown in green in Figure ⑦. Front and back adjustment: When you need to adjust the distance between the night vision goggles and the human eye, first turn the equipment locking knob of the helmet pendant counterclockwise, and then slide the night vision goggles back and forth. After adjusting to the proper position, turn the equipment clockwise to lock Turn the knob, lock the device, and complete the front and back adjustment, as shown in blue in Figure ⑦.